Almost 2 rolls of Scotch mounting tape (which I actually found at a dollar store), and about 11 Ikea placemats later, a new look!
But first I want to give props to my inspiration, from this post on Curbly, transforming a rental kitchen with dollar store placemats.
Before:
I hate the pinkish tile that clashes with the beige-toned marble.
But the thought of ripping that all off (all the way up around the window too) and losing my kitchen for days stressed me out.
Here's a couple of hours over 2 days, no mess...
After:
TaDa!!!
I know it's not for everyone, but I love it. My kitchen pops! Has personality!
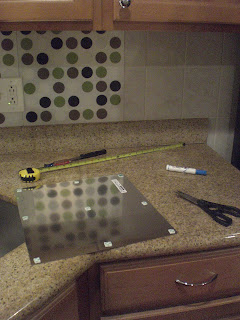
Here's in progress:
Measure the area, mark off cuts in dry-erase (which wipes off when you need it to), chop with kitchen shears, stickies on back and place it on the wall! Shiny side on the back will provide extra uses for the extra placemats I bought in case of failure.
And the outlet plates help to hold them on.
Magically, the green dots match the mat and towel I bought ages ago.
Also part of the kitchen upgrade was a wine glass rack:
And a storage shelf, which needs some upgrading before pictures.
Productive weekend!


Ashley, I love it!
ReplyDeleteAnd using dry erase marker is a way better idea than using a regular pen and swearing.
Thanks for linking back and thanks for sharing, it's awesome to see other peoples takes on an idea.
Erin (lilybee)
Wow, I love it! When I first saw your "before" picture, I thought there wasn't much wrong with your kitchen. But, the dots in the "after" really make it look great!
ReplyDeleteSuper cool! You did a great job & you can't even tell that they're placemats :)
ReplyDeleteI am here from Better After- I love this idea!!!
ReplyDeleteNew Follower. :D
It looks awesome! It really doesn't look like placemats at all. Good job!
ReplyDeleteThanks! I'd honestly forgotten about this for a bit, but I'll post some of my new projects soon!
ReplyDeleteWell, I can't believe it - it looks fabulous - how dramatic and how improved. Great thinking! Linda
ReplyDeleteOk, that is seriously genius!!
ReplyDeleteLOVE it! I wonder if I could do this on painted walls or if that tape would be a nightmare to remove later?? Well, you got me thinking...thanks!!
ReplyDeleteThat looks amazing! Who knew a kitchen could look so awesome with a placemat backsplash. Great job!!!
ReplyDeleteI am also here from Better After! I'm a new fan! This is so cost effective, it is just what I need for my cheapie kitchen change!
ReplyDeleteLovely idea! I think your kitchen does pop and it looks amazing <3
ReplyDeletethese are metal place mats? you noted the shiny on the back, so i'm assuming these are metal? there are no ikea stores near me but i'd love to try this. any suggestions on finding something similar?
ReplyDeleteIKEA says they are "Polypropylene, PET plastic"
DeleteI would check dollar stores for something similar.
Where did you get your place mats from?
ReplyDeleteIKEA! http://www.ikea.com/us/en/catalog/products/70151712/
DeleteSurfed in from Pinterest! I LOVE it! I will have to keep an eye out for some awesome placemats!!!
ReplyDeleteWhat a big difference!! Very nice!
ReplyDeleteMay I ask how these held up in the kitchen, with the moisture and heat and constant clean up?
ReplyDeleteIts been 4 years and it's holding up great! I initially started to use clear caulk on the seams, but gave up on the 2nd or third panel. No problems with the tape losing its power. Wipes down fine.
ReplyDelete